Wide establishing shot… Medium two-shot… OTS single… Reverse… Reverse… Reverse… Punch in for a dramatic close-up…
Sound familiar? It’s how most film and television scenes are shot and edited. Sure, it’s a little boring, but it works. And if you have talented actors delivering crackling dialogue, what more do you need?
But what if I told you that with a little more preparation you could inject some extra energy into your scene and make your shoot more efficient?
Meet the MOVING MASTER, your secret weapon for dynamic coverage.
Can you spot the moving master in the opening scene of Sam Mendes’ Skyfall? It actually starts as a POV shot as Bond discovers the bodies on the floor, then shifts to a medium close-up as he enters the room, a wide when he discovers the wounded agent in the chair, then a medium when he approaches him. Keeping the master moving gives this static scene some energy and forward momentum.
Before we go into detail about what a moving master is and how to shoot one, let’s define some terms.
When we talk about coverage we are referring to the various shots we use to capture a scene. An establishing shot, a dirty single, an insert… each shot will have a different set-up, allowing us to edit together the many elements of the scene in the way that best tells our story.
The foundation of coverage is the master shot, a shot that films the majority of a scene in a single, unbroken take, with the intention of editing in other shots later. Most scenes actually play out in medium shots or close-ups, but the master shot can function as a security blanket, giving the editor a neutral shot to cut to when the other coverage isn’t working. Because it’s used to tie the other shots in the scene together, the master shot is often static, framed medium to wide, but as you’ll see, that’s not always the case.
In fact, one common mistake for inexperienced directors is to use their wide establishing shots as their master. While many great films have made effective use of wide shots, cutting back out to a wide is a very specific, and dramatic, choice. In the editing room, wide shots can be difficult to integrate into the middle of a scene, and directors who spend a lot of time and energy trying to nail the perfect take in the wide often regret it later.
Sometimes filmmakers forego coverage altogether and film a scene as a oner instead. A oner captures all the major elements of the scene in one continuos, moving shot. It requires careful choreography and extensive rehearsals. It’s technically challenging, time consuming (it usually requires several takes to nail it), and a little showy, but when done well it can make any scene more dynamic, immersive, and intense.
One of the most famous oners ever, the tracking shot into the Copacabana from Martin Scorsese’s Goodfellas. Incredibly, the shot was blocked, rehearsed, and in the can by lunch!
The moving master combines the best aspects of the oner into a conventional master shot. Much like a oner, a moving master is meticulously planned around the beats of the scene, using blocking to manipulate the camera and actors into specific compositions. But unlike the oner, you don’t need to nail your moving master in one take. The idea is to capture as much coverage as possible in a single set-up, then film reverse angles and inserts, and combine all these elements in the editing room.
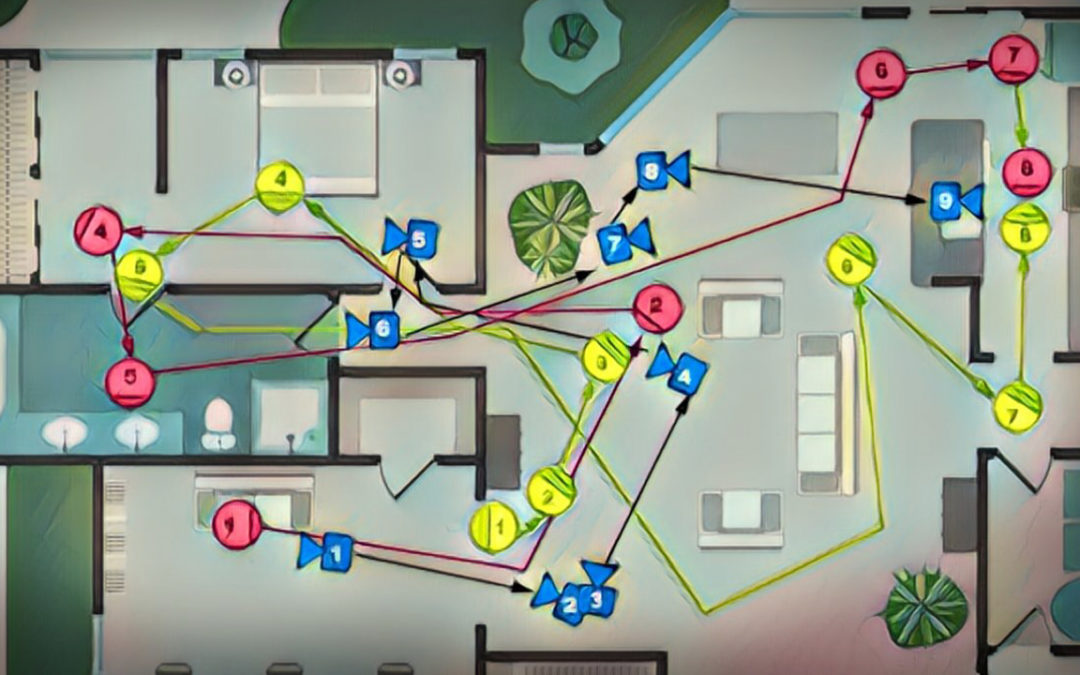
In this scene from Skyfall, the master is a tracking shot preceding James Bond as he pursues Silva through the crowd, intercut with shots of Q and reverses from behind Bond.
One of the great advantages of the moving master is efficiency. The sad reality of a film set is that most of the day is spent setting up shots, not shooting them. By combining several different shots into one big set-up, a moving master can let you dedicate more of your time to getting the performances you need. And by keeping the camera fluid and moving, you can inject an ordinary dialogue scene with a bit more energy.
So how do you create a moving master? The key is preparation.
First, break down your script and note the important beats in the scene. Where does the dramatic tension rise or fall? Are there any reversals or surprises? What is the climax of the scene, and how does it resolve?
Next, decide how you want to compliment those beats visually. How can you compose those moments to accentuate the text and subtext?
When you have a solid understanding of the key moments and how you’d like to portray them, bring in your actors and get the scene up on its feet. Remember, moving masters are about movement, so give your actors some business to do. Find actions and movements that feel natural to your performers and also fit in the context of the story. Use their relative positions to reinforce how their relationship changes in the scene. (For example, if your characters begin the scene united and end it in opposition, you might open with your actors facing the same direction, and close with them facing or even looking past each other.)
Now is also the time to start considering what you might want to cut to. Are there any inserts that are important to the story? Is there a critical reaction shot you know you’ll want on screen? What kind of composition will your reverses have, and do you want to mirror frame size and position for smooth transitions or create contrast by juxtaposing incongruous shots? Make some notes. You’ll need them for the next step!
This scene from Robert Zemeckis’s under-appreciated thriller What Lies Beneath is almost entirely composed of just two shots. Pay attention to how Zemeckis uses the spacial relationship of the camera and actors to support the beats of the scene.
Finally, bring in your camera operator and coordinate his movements with the actors’. Focus on how the frame changes during the scene. You might want to start in a medium shot, move in for some close-ups, and end very wide. Or you might start very wide and gradually shrink the frame until you are tight on one performer. Communicate your intentions clearly so your camera operator and DP can help coordinate the blocking.
You’ll also need to decide how to move the camera. For low-budget films this will probably mean a handheld camera. A gimbal or Steadicam rig can give you a lot of flexibility while keeping the camerawork smooth and unnoticeable. And don’t sleep on a good old fashioned dolly! It might seem limited, but creative blocking can pull a variety of compositions and movement out of a simple dolly move.
Once the scene is blocked, your G&E team can start lighting. Ideally they will use as many practicals as possible and hide any additional lights they need. But remember, the great thing about the moving master is that you don’t have to get it all in one take. You can easily cut around a flubbed line or some equipment drifting into frame. You can also find a cut point to break a very long take into two smaller shots, making adjustments in between.
Once you’ve got your master in the can, you can complement it with the reverses and inserts necessary to complete the scene. And if you’re really ambitious, you can turn the camera around and shoot another moving master to catch those reverses and any other angles you might want (as in the Jerry Maguire clip below).
This scene from Cameron Crowe’s Jerry Maguire is basically a pair of oners intercut with a few select close-ups. Imagine this dialogue playing out between two characters sitting across from each other at a table. It just wouldn’t be the same! By keeping the performers (and the camera) active, this dialogue-heavy scene maintains high energy throughout.